Monday, May 9, 2016
HW14.4 Brushbot
For my robot, I decided to attach my motor to a tube of chapstick. I am always in need of chapstick and I like the idea of creating a tube that could follow me around and always be at my disposal.
3 Credit Project
Besides doing extra artist research throughout the semester, I completed an additional project to earn an extra credit for this class. My project focussed on the relationship between digital embroidery and hand embroidery. First, I used a digital embroidery machine to make the original design. I chose to only use designs that are inherently available on the machine. Digital embroidery gives you the option to create your own designs on Illustrator and then upload them to the machine, but I wanted to focus on the machine as much as possible during this step and not bring my own creative process into it. I used two flower designs that are available in the machine's factory settings. I decided to use warm tones of thread in the pink and red family. I used the same flower design multiple times, but changed the size and placement. The machine was interesting to use and its speed was incredible.
This is a time-lapse video


This is a time-lapse video

Once I was done using the digital embroidery machine, I was left with a rather plain looking hoop, so I began to to imagine how I would add hand embroidery to the project.
 |
| I accidentally cut the fabric and had to superglue it together, therefore there is a glue stain towards the top |
I wanted to distinguish the digital and hand embroidery as much as possible so I decided to use bright green threads of different hues. To contrast the organic images of the flowers, I chose to create geometric shapes with my hand embroidery. I also think it is slightly ironic that the machine was used for the organic aspects of the work and my hands were used for the more manufactured features.


HW14.2 Final Project
For my final project, I used Photoshop to design my own origami paper. The paper is a mandala of children at play and children's toys. I found the images online and cropped them of their backgrounds. I used Photoshop to flip and mirror them in different ways. I made one version of the paper with a black background and one version with a white background. The mandala was meant to focus on the physical and childlike aspects of the theme, play.


I then used the paper to make an origami chess set. I used the origami deigns of Joseph Wu, which can be found at http://www.josephwu.com/Files/PDF/chess.pdf. There were six distinct piece designs for the king, queen, rook, knight, bishop, and pawn. The paper design with the white background was used for the white pieces and the paper design with the black background was used for the black pieces. The result is a usable chess set. I chose to make a chess set because it represents the strategical, cerebral aspects of play.
 |
| Joseph Wu's designs |


 |
| Details of the Knight piece |
Wednesday, May 4, 2016
HW14.3 Class Review
Looking back on this class, I have learned many practical and theoretical things about new media art. The class discussions allowed me to build my opinions of new media based off of the ideas and experiences of my classmates. I especially enjoyed the hands-on studio aspects of the class that allowed us to be creative with the materials and tools that we were learning about. I can see myself returning to many of the projects we did this semester as inspiration in the future. I think that new media art techniques are an interesting addition to the art classroom and allow students to explore different ways of making.
As for my personal learning objectives for the semester, through the artist research and hands-on work I have become more aware of the benefits of new media materials for artists. The possibilities are endless when it comes to new media art and different artists can use the same materials to create vastly different projects. Digital technology also allows new media artists to display their art in more ways than traditional mediums.
The projects in this class have also helped me accomplish my second learning objective. I have learned to combine different art mediums especially through the final project and my extra credit project. Combining machine embroidery and hand embroidery was an explorative project due to their extreme similarities and major differences.
Thursday, April 28, 2016
HW13.3 Reading Response
I was fascinated to learn about A.C. Gilbert and his dedication to his Erector Sets. The way he invented so many types of maker sets and even created his own magazine to publicize the value of making and tinkering is incredible. I think that his work led to the proliferation of hands-on, experiential activities for children, but it was also clearly motivated by financial gain. As a salesman, Gilbert's main goal was to sell and although his products were actually great, he used lies and hyperbole to sell them. The economics of maker sets is still an issue today as many companies sell pre-packaged kits that result in a product, but do not extend far beyond that, unless you buy another kit.
I also found it interesting that the introduction of "physical computing with Arduino and other microcontrollers, low-cost 3D printers and cutters, and programming" have had such an influence on the making revolution. I am especially interested in the implications of accessible 3D printers because I think that they may be the answer to the limited scope of maker kits. Although maker kits only really allow you to create one project, the use of 3D printers would allow you to reuse the components of a maker kit in new ways. Once you are exposed to the technology included in the maker kit, you will inevitably have your own ideas for its other uses. 3D printers will allow you to design and create materials that can make your ideas a reality.
I also found it interesting that the introduction of "physical computing with Arduino and other microcontrollers, low-cost 3D printers and cutters, and programming" have had such an influence on the making revolution. I am especially interested in the implications of accessible 3D printers because I think that they may be the answer to the limited scope of maker kits. Although maker kits only really allow you to create one project, the use of 3D printers would allow you to reuse the components of a maker kit in new ways. Once you are exposed to the technology included in the maker kit, you will inevitably have your own ideas for its other uses. 3D printers will allow you to design and create materials that can make your ideas a reality.
Wednesday, April 27, 2016
HW13.4 Blog Makeover
My blog is perfect the way it is, I put a lot of effort into it earlier in the semester.
Tuesday, April 26, 2016
HW13.2.2 Maker Artist Research: Wendell Castle
Wendell Castle is an artist who designs uniquely looking and uniquely useful furniture. The pieces are highly stylized and comprised of flowing shapes and forms. As a maker, he used creative tricks to solve his design difficulties, such as using many smaller pieces of wood to create an object that looks like it is carved from one large piece. Each of his works is useful to its owner, sometimes they even have two uses. Some of his chairs have attached tables that can be used by the sitter or by someone in a separate seating area. He also created a chamber in which someone can seclude themselves with an attached light to signal their presence. His works highlight the craft used in their creation and exemplify the making process.


Sources:
http://madmuseum.org/exhibition/wendell-castle-remastered#
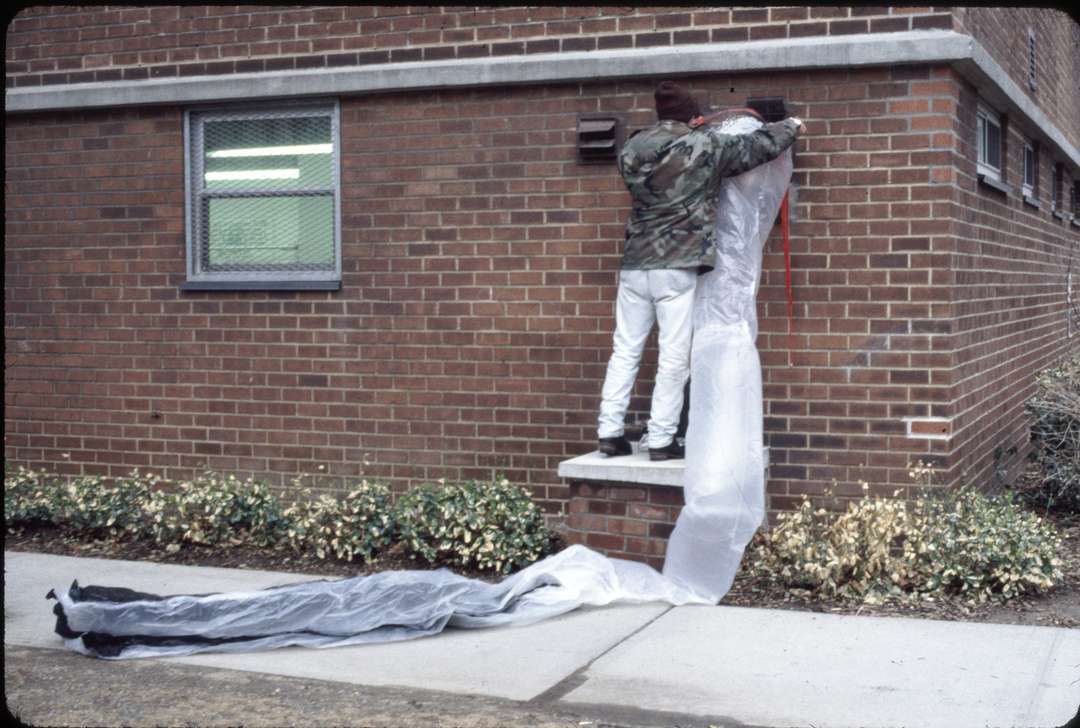
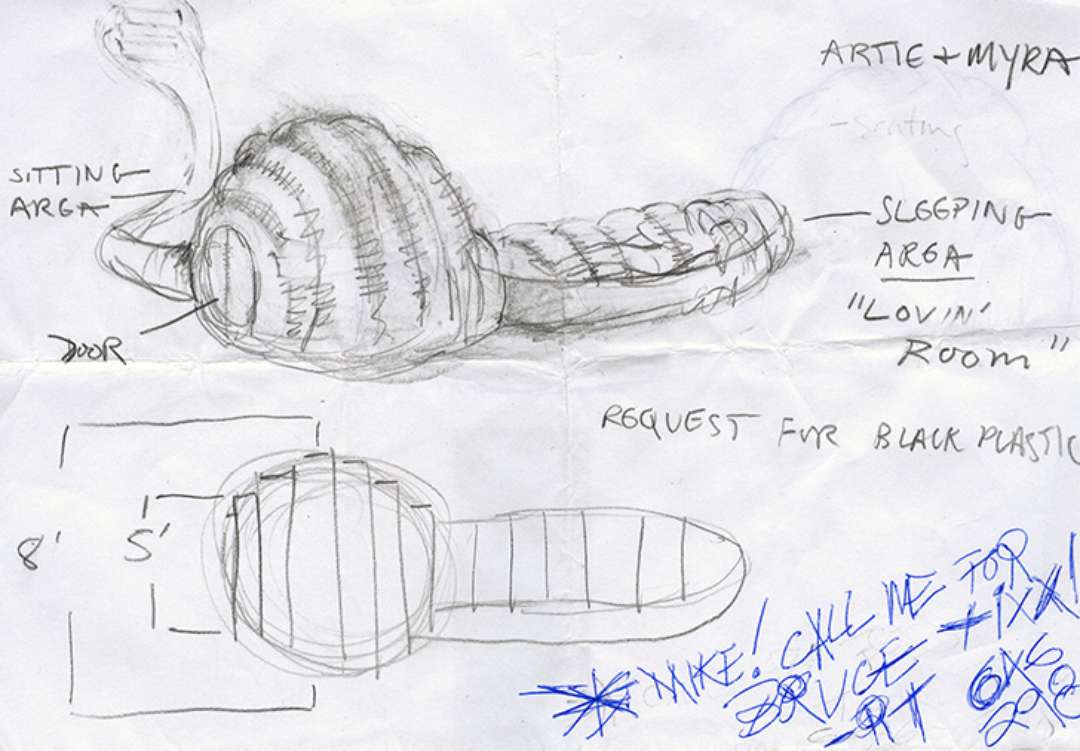
HW13.2.1 Maker Artist Research: Michael Rackowitz
Michael Rackowitz is an artist who designs and creates shelters for people without homes. The shelters are made of plastic and tape or heat sealer. Their main structural form is caused by hot air from HVAC vents which inflates the tent-like objects. The air flowing through the shelters also keeps the occupants warm in the bitter cold of winter. Rackowitz makes each structure specifically to the specifications of the future inhabitant and each one is unique. He is a maker because he is using art and design in a clever way to solve a problem while also highlighting the aesthetic qualities of the forms.


Sources:
http://architizer.com/blog/michael-rakowitz-parasite/
http://www.michaelrakowitz.com/parasite/
HW13.1 Recipe

I was not able to attend the workshop last week, but I am fascinated by the idea of "recipes." My recipe was created to help me to remember to meditate. I practice meditation, but it is difficult to remember to take the time every day and I can often become distracted by other priorities. My recipe is triggered when I have an event in my calendar with the word "meditation" in it. I will have to schedule all of my meditations ahead of time. When the scheduled calendar event begins, my phone will begin to play soothing music. This will automatically remind me to meditate and put me in the right mood to relax and put aside my other work. I think it is very useful and slightly ironic, since meditation is often about distancing yourself from electronics and the internet and focusing on your physical and mental needs. In this case, however, the two work together well.
Wednesday, April 20, 2016
HW12.1 Basic Circuit Greeting Card
I used basic circuits to create a card for my mom for Mother's Day. One of our favorite songs is 'You Are My Sunshine' so I used the lyrics of the song in the card and created images to accompany them. The basic circuitry allowed me to add LEDs to the lightning bolt of the "grey skies" within the card.
- Poke both LEDs through the paper.
- Spread the cathode and anode (the two wires of the LED) apart and flatten them on either side. Make sure that the cathodes of both LEDs are on one side and the Anodes of both LEDS are on the other side.
- Lay down a strip of conducting tape over the Cathodes.
- Lay down a strip of conducting tape over the Anodes, but leave a 1 inch section of tape open at the bottom.
- Attach a battery to the 1 inch section of Anode conducting tape.
- Bend the Anode conducting tape so that the battery touches the cathode conducting tape.
- The LEDs should light up when the battery connects the two tapes, this is a switch.


Although I thought this was an interesting process, I did not like the act of making a project specifically to use basic circuits. It felt stifling. I would rather add basic circuits to a project that I was already invested in and that I thought could be improved by LEDs, etc.
Monday, April 18, 2016
HW12.3 Final Project Idea

When I rolled the dice for my final project, I was dealt PLAY as my theme, DIGITAL DRAWING & PAINTING as my new medium, and SCULPTURE as my traditional medium.
For my project, I plan to use Photoshop to draw two abstract designs, one in a dark color palette and one in a light color palette. This will be the digital drawing portion of my project. I will then print my designs onto paper and use that paper to create an origami chess set, with the dark design as the black pieces and the light design as the white pieces. This will be the sculpture aspect of my project. I will also probably design a chess board using Photoshop. The final project will be an interactive work which invites the viewers to play with the chess set, thus highlighting the theme of play.
HW12.2.1 Physical Computing Artist Research: Theo Kamecke
Theo Kamecke is an artist who uses basic circuits in an alternative way. Kamecke does not actually create functional circuits to power his work, instead he repurposes circuits as a material for his visual art. Kamecke is interested in the aesthetic patterns within circuits and views them as continuations of patterns found in nature. After dismantling circuit boards into their basic components, Kamecke rebuilds them like puzzles into patterns resembling hieroglyphics. Although the works favor beauty over function, they highlight the ubiquity of computing in the modern age while promoting circuits to the level of art.


Source:
http://www.theokamecke.com/artiststatement.php


Source:
http://www.theokamecke.com/artiststatement.php
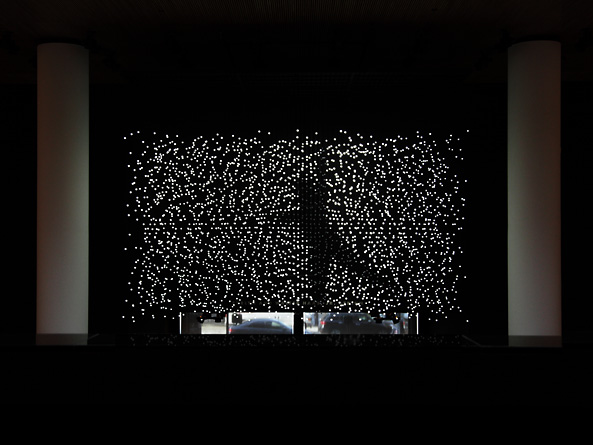
HW12.2.2 Physical Computing Artist Research: Jim Campbell
Jim Campbell is an artist that uses physical computing to instill energy and form into light and shadow. Using over 2000 LED lights, Campbell hung them from a grid using wires to create a 16x20x11 ft canvas of lights. The entire work was hung from the ceiling in an expansive room so that the lights floated above the heads of viewers. On their own, the LED lights mimic stars in the nighttime sky and have a delicate randomness in their order. However, the lights also act as a cinematic screen for playful shadow images. The LED lights have been programmed to dim and create the outlines of human figures. The use of negative space in the formation of the figures is an interesting element that adds to the unique three-dimensional LED form.


Source:
http://www.jimcampbell.tv/portfolio/public_art/exploded_views/
Tuesday, April 12, 2016
HW11.5 Student Teacher Response
Listening to the three student teachers who spoke during our last class, I was surprised to hear how little new media is actually used in classrooms. After being in this class all semester, I have become so accustomed to new media tools and projects that I had forgotten that most art classrooms rarely utilize them. I enjoyed hearing the pros and cons of new media from people who have used it firsthand. I thought it was interesting that the stop-motion program was only on some of the school's computers, forcing the students to work in groups around a single computer. The lack of supplies isn't ideal, but hearing about the students' teamwork and collective participation as a result was reassuring.
HW11.4 Sound Lesson Plan
Age Group: High school students in groups of 3-5
Time: 3 hours or 3 class sessions
Objective: Students will learn to use storytelling, sound editing, and non-visual means of expression.
Materials: Audio recorders (possibly smart phones), paper, pens, sound editing software
Activity: Students will choose a classic fairytale (e.g. The Three Little Pigs, Hansel and Gretel). Students will then map out the story and record audio including narration and sound fx. The students will then edit the audio into a 10-15 minute track.
Questions: What was the most challenging part of the project? Was it difficult to create a vibrant narrative using only audio? Did you use the editing software to change the original recorded sounds and did that affect the project?
HW11.3 Blank Assignment
For my blank assignment, I returned to working with sound. This time however, instead of working with sounds that I created, I used sounds that I downloaded from the website freesound.org. I downloaded different versions of laughter from different users on the website. Together, they create an alternative sort of laugh track, like those used on sitcoms. There are very different styles of laughter from children to individual men to large groups of people laughing. I played around with the echo and reverb features to distort the laughter towards the end. I wanted all of the laughs to combine into a sort of white noise.
HW11.2.2 3D Printing Artist Research: Morehshin Allahyari
Morehshin Allahyari created a 3D printed art project in response to the 2015 destruction of ancient artifacts at the Mosul Museum in Iraq. The original statues from the Roman period city of Hatra and Assyrian artifacts from Nineveh were destroyed by Islamic State extremists with sledgehammers. The Mosul Museum kept no catalog of their collection and little information is available on the destroyed pieces of antiquity. Through her research, Allahyari was able to find old scanned photographs of some of the destroyed objects. Although 3D printed models are usually made using multiple photos from different angles, Allahyari worked with what she had and created models based off of the old photos. The collection of 3D printed images is called Material Speculation: ISIS and each work was made using clear filament. Within each objects, a memory card is lodged which holds the 3D model design along with images, maps, pdf files, and videos relating to the history of the original artifact.


Sources:
http://www.morehshin.com/material-speculation-isis/
http://www.dailydot.com/technology/isis-3d-printing/
HW11.2.1 3D Printing Artist Research: Ji Lee
Ji Lee is an artist who used 3D printing to create a public art project. His work, Mysterabbit, is a series of 10,000 identical, tiny bunny statues. The bunnies are shown in a mediative pose and are placed in random spots around the world. Mysterabbits have been found in South Korea, Iceland, and even the United States. The purpose of the project is to stop people in their daily routines and allow them a moment of joy and surprise when they come across the small hidden rabbit in public. By using a 3D printer to create this project, Lee was able to make the project a truly "public" work. The 3D model is available for free on its own website and people are encouraged to print their own meditating bunnies and add to the project.


http://www.mysterabbit.com/about
http://www.huffingtonpost.com/2014/06/30/3d-printing-art_n_5534459.html
HW11.1 3D Printing


Subscribe to:
Posts (Atom)